Pages

Tuesday, October 23, 2012

Water marbling - nail art


Since moving away from Queensland, my nails just haven't been the same. My new salon in Sydney charges a fortune for any art (even if I provide the materials) or coloured acrylic. Consequently, I've had to resort to maintaining a simple French manicure style. I have changed the nail shape - from a big chunky square edge to a more refined point/oval - but the essence of my daggers remains!

I've been in search of a way to use my large collection of nail lacquers and art materials to brighten up my precious talons. After discovering the water marbling technique via various nail blogs and YouTube videos, I decided to give it a shot for myself. I had seen several examples with similar colours and shades with a melding effect but I wanted something more bold and bright.

First attempt: Groovy Swirls
OPI The "It" Colour (yellow)
OPI A Roll In The Hague (orange)
OPI Purple With A Purpose (purple)

I'm quite fond of this colour combination, but the opacity of the yellow started to bother me, being able to see the white French tip underneath.


Second attempt: Pelagic Patterns
China Glaze Four Leaf Clover
OPI Teal The Cows Come Home
OPI Blue My Mind
China Glaze White on White

I thought the blue green hues would add a nice blended effect. Using white in a marble can be quite hit and miss - dark colours (such as black) can bleed in to the white and create a grey tone, or, the white can be so thin and translucent you simply lose the effect altogether. Again, the white French tip is visible with this combination which detracts from the effect. Oh, and it's been commented that these colours make it look like I've smooshed toothpaste on my nails!


Third attempt: Pink Candy
OPI Cha-Ching Cherry
OPI Ate Berries In The Canaries
China Glaze White on White

I really am a girly girl when it comes to pinks lately. The slight variation in pink and red hues here blend very well, and the white adds that crisp pattern. You may notice too that my acrylic infils have been done entirely in CND's Warm Pink (Opaque). I figured there was no point paying that $10 extra per month for French tips when I'm only going to be covering over them. Plus, they look fine on their own without any other colour.


HINTS AND TIPS:
  • always use filtered water in your marbling, just to ensure it's as clean as possible
  • vaseline around the finger seems to be the most effective way of preventing all the excess lacquer from sticking to the skin. Also, a very thin layer is sufficient (as opposed to the massive slick I applied when first testing out the method).
  • don't topcoat the nail too soon after marble application - it will cause the lacquers to melt and bleed
  • metallic lacquers do work but not as well as a solid colour. I'm yet to try any glitter lacquers but I can't see they would work well at all

Monday, September 17, 2012

The cheat's Tiramisu

Last week I reinvigorated my cake decorating skills to make a three layer (single tier) birthday cake for two colleagues. There was plenty of left over sponge, and that sponge which had been trimmed to level off each layer. So, rather than waste it, I froze it, figuring I'd find something to make with it at a later day. Well that day came today.

I've always been a fan of a rich, strong Tiramisu, but I rarely have the time or inclination to make a full dish from scratch. So if you're like me and want to find the quick and easy way to make things, here's the recipe (minus quantities as I do!) for you!


Brew some good quality coffee and allow it go cold. Mix in some Frangelico and Kahlua to taste.

Tear off a chunk of the sponge and place in the bottom of the bowl/glass. Pour over some of the coffee mixture to allow the sponge to go nice and soggy. Add some crumbled bits of Milk Coffee biscuits on top (I was hoping this would add some crunch to the Tiramisu but it just added to the sponge density with the absorption of the coffee - oh well).

Using Philadelphia Cream for Desserts, spread a nice even layer over the top of the sponge/biscuit. Pour a little coffee mixutre on top to ensure the flavour is strong.

Repeat the process starting with another layer of sponge, and finally finish with Cream and some crumbled biscuit and sponge bits.


Dig in and enjoy!

Tuesday, May 1, 2012

Nail Art Trials

Since the TieDye Surprise nail art discovery, my fascination with different nail art products and techniques has taken over. The delivery of Dollar Nail Art products kept staring at me, asking to be played with! So, I obliged. In the week leading up to my monthly nail infill appointment, a couple of my acrylics snapped off, so I used the natural nail beneath to practice the application of some foils and new lacquers. The results are below:

OPI "Ate Berries in the Canaries" lacquer covered with Rose Frost foil applied in random patches. I learned that when applying a top coat over foil, it's best to quickly apply the first coat, and not drag the brush too slowly along the foil. It causes some colour transfer to the top coat brush. The second top coat doesn't experience this issue. Also, using a UV top coat doesn't seem to cause the foil colour transfer.


OPI "Purple with a Purpose" lacquer covered with Laser Optics foil attempted to be applied in one straight sheet (didn't quite work out that way!)


OPI "Purple with a Purpose" lacquer topped with OPI Gold Shatter. Learning the right application for the Shatter isn't as easy as it looks. I'm still working out the best thickness and coverage to use, for both the Gold Shatter and the Black which I have. But I can say for certain that Shatter must be applied over freshly dried lacquer for the effect to take. I had tried applying Shatter directly on top of an old UV set top coat and it simply painted on like a thick, gluggy lacquer without any crackling occurring.


OPI "Purple with a Purpse" lacquer with White AB Ice Chips applied over the top.


I also had play with Sparitual "Bon Appetit" lacquer with some copper nugget on Mum's nails. The effect is great, but I still have to work out the best way to apply and build the nuggeting for either a total coverage or a pattern,


And the piece de resistance ... my latest set of acrylics:

These are CND Shellac in "Black Pool" with Dollar Nail Art Roman Marble foil over the top, and CND Shellac Top Coat. Most nails were foil covered in one piece, except my thumbs which required an application in two halves (top and bottom).

Nail Art & Pretty Bits

Those of you who are associated with my twitter or Facebook accounts, or even me in person, would know that for years now my nails have been like my signature. The sheer length and size of them seems to attract comments such as "how do you do anything with those?" Well, after having acrylic nails for eight years I can tell you that I don't notice them - they are part of me and I've adapted to doing every daily chore without issue (well, except for opening the laundry trough cupboard, but I blame the magnet for that since I'm not the only person in the house who has troubles with it!)

Most recently my nail technician moved from doing french tip style nails on me to doing some full nail cover art. My first full cover was a CND Shellac "Rock Royalty" covered with a TieDye Surprise foil. The foil was applied in random patches as opposed to the full sheet effect. The nail was sealed with the CND Shellac Top Coat.


I became totally fascinated with the foil so I did a little internet searching. Having seen the vial my nail tech had containing the foil it was quite easy to identify the real product when I found the online supplier Dollar Nail Art. This is one of the greatest sites containing nail pretties and it's fair to say I became blinded by all the sparkly bits!

So, a friend of mine (also consumed by nail pretties) and I split an order of products from Dollar Nail Art. The haul cost $39, inclusive of postage and was delivered (from the US) within a week of placing the order. I was mightily impressed! We picked up stock of laser lace, nuggets, foil, glitter, ice chips and flats.


So here's the breakdown of the products above:


Purple and Gold Butterfly Flats, and Metallic Pink and Gold Heart Flats


Laser Lace in lime, raspberry, gold and sky blue.

Nuggets - Gold, Silver and Copper

Ice Chips in White AB, Fuchsia and Sky Blue

Foils: Gold Dots, Laced Gold, Roman Marble, Elven Gold, Gold Crush

Foils: Ocean Mist, Rainbow Swirls, TieDye Surprise, Silver Dots

Foils: Majestic Tides, Aegean Tides

Foils: Peach Burst, Rose Frost

Foils: Firelight, Laser Optics

Pastel Glitter: Green Pearl

There are some more blog posts coming up showing how these products have been used. Until then, enjoy the sparkly bits here!!


Monday, April 23, 2012

Yuen's Haul

In my last blog post, about Malaya Corner, I mentioned doing some Asian Grocery shopping at Sunnybank. The main grocery store there is Yuen's... a treasure trove of goodies in strange packaging and the occasional purchasing mistake!

Most recently I collected some of the following sweet treats:


Green Tea Oreos - these are like the Vanilla Ice Cream versions we have in Australia, with that menthol buzz to the mouth, but also an underlying matcha flavour

Mochi - usually I pick up a variety of sesame, taro, fruit flavours and chocolate mochi

Pocky (and in this instance, the Pandaroo version "Stix") - I couldn't find any mango or green tea mousse this time, but thought a bit more of a decadent version would suffice - the double chocolate (chocolate stick dipped in chocolate.) For the record the Stix are nowhere near as nice as the original Pocky.


A packet of Pandan Pudding mixture also made its way in to the shopping haul this time. The pudding mix required combining with boiling water then refrigerating in desired moulds. As this was being served for dessert, it was pleasantly set in Martini glasses.

The pudding had a lovely coconut flavour without being excessively sweet and a blanc mange texture, albeit slightly more gelatinous. For added taste and texture, coconut jelly cubes were added. Oh yes, and the pudding was a distinctive green colour!

Malaya Corner, Sunnybank

Occasionally I make the trek towards Brisbane to Sunnybank for lunch & a decent shopping haul of Asian groceries. Each of the restaurants there (more like cafe's in all honesty) are from a different region of Asia, presenting some very authentic meals. Most recently I took my parents to Malaya Corner for a feast of Malaysian cuisine.

We dined on:

Seafood Laksa - complete with zucchini, egg plant pieced and fried tofu puffs


Char Kway Teow - with flat rice noodles, Chinese sausage, fish cakes, scallops and lashings of thick black sticky sauce


Nasi Lemak - coconut rice, beef rendang, chicken curry, peanuts and all the pickled trimmings


A glorious feast and all for minimal cost - the meals cost $37 in total.

Update: Prepare Yourself

Oops, it's been over a month since my last blog post. I can't excuse it by saying life took over, because, well, the concept of a food blog does involve a fair chunk of life anyway!

So there will be a few blog dumps coming your way in relatively quick succession. I'm going to find all the photos on my camera and phone that relate to what this blog is meant to be about and put some fancy words to them! They wont all be food based either - the Four F's (Food, Fashion, Fitness and Fun) will still be covered. There are definitely some posts pertaining to gym clothing and nail art coming your way too!

~M~

Monday, March 12, 2012

Pumpkin Soup and Chicken Caesar Salad

Saturday night's dinner was a bit of a mash together. Nobody wanted anything heavy and the warm day meant nobody really wanted anything hot either. Looking around the kitchen, I decided on making a big pot of pumpkin soup and a chicken caesar salad.

Now remember when I said I don't use actual recipes.... below is all a guesstimate as to quantities used!

I will confess, I love Butternut pumpkin. Rarely will I buy any other variety. I cut up about 1.2kg of Butternut in to approx. 3cm cubes and roasted at 200 degrees for 20-30 minutes until the flesh becomes soft but not baked hard.

One leek sliced finely with a couple of tablespoons of butter in a medium heat saucepan to allow the leeks to soften but not colour. Add two medium potatoes (peeled and diced to 1cm cubes) and 1L salt reduced chicken stock (you can use vegetable if you like.) Add the baked pumpkin and two tablespoons of honey, and bring to a rapid simmer. Leave simmering until you can see the potato pieces starting to crumble in the stock and the pumpkin starts to mush up. Remove from heat, put lid on saucepan and allow to stew in its own warmth for about 15 minutes. Blend to a puree (I find I have to do this in two batches in my blender.)

You can add cream if you wish at this stage, or just a good dollop of sour cream (or cooking Philadelphia) when serving. The dishes in the image are served with chives from the garden.


Caesar salad has never been a favourite of mine. I think perhaps I consumed a dish once with a vile rendition of sauce on it and it put me off the thought of eating Caesar salad for quite some time. But I noticed we had a rather large Cos lettuce in the fridge, and knowing this household, the lettuce would normally go off before it's even looked at.

I decided to make my own version of Caesar sauce - one whole egg, two tablespoons of white balsamic vinegar, two tablespoons of Dijon mustard and four anchovy fillets with some of the oil from the jar all whizzed up in the micro blender. When the mix comes together, add a grind of salt and pepper and slowly drizzle in about a 1/4 cup of good quality light olive oil. Remember, all quantities give and take depending upon how it tastes and works for you!

The salad was simply a stack of chunky Cos lettuce, toasted slices of Turkish bread, shaved parmesan cheese, crispy pieces of bacon, soft boiled eggs, quick cooked slices of chicken breast, anchovy slices and the sauce.

Disfrute de su comida (or something, in Spanish!)

Thursday, March 1, 2012

Gym progress

Most people join a gym to lose weight or bulk up. I, apparently, achieve neither of these at the gym. Several years ago I pushed my physical limits with a 13-times per week exercise routine combining general cardio, weight training, RPM classes and pole training, and after an initial "nothing happens" stage for three months I started to lose weight. This resulted in a total of 13kg shed.

This time, I've been back at the gym for over six months, and whilst my routine isn't as regimented, I would have still hoped to see some changes, somewhere other than my bank balance.

I will add the point that my heart medications were changed just before Christmas and the new pills resulted in me being able to go like the clappers on the cardio equipment, with a heart rate of 190bpm, and not feel dizzy, lethargic, muscle cramps etc. It was like the meds induced some kind of bionic strength!

So my average routine now is a good 40-60 minutes of cardio on the elliptical trainer, upright bike and treadmill (my 'running' is limited to 90 second bursts followed by 2 minutes of dying!). This is four or five times a week and a solid weight training session with my PT.

We've faced the fact that I don't lose weight, and I don't really bulk up muscle either, so the weight training has just become a weekly challenge to see what weights I can achieve for arms and legs. Whilst this is indicative of increasing strength and muscle tone, it's hardly reflective in any physical appearance.

So, the major weekly challenge is my leg press ability. I remember when we first started out, the idea of being able to leg press 150kg (100kg of biscuits and 53kg for the press plate) was impressive to my trainer. Little did she know how much strength I had in me. And I confess, I had no idea either! After that first session I did a little bit of research about "how much should I be able to leg press?" Most of the male oriented body building sites suggested a capability to press 2.25 times your body weight. So working with this factor, and adding a little extra,  I went back to my trainer the next week and said I had a goal of 240kg. Well that was blown totally out of the water. Within 3 weeks I was up to 343kg on my fourth set, completing 12 reps without fatigue.

Then I had two weeks off with gland infections and being stuck on medication. I figured it wasn't worth pushing my body when my immune system was depressed and obviously my body was unwell.

I went back the third week and the theory was to just take it easy to get me back in to the weights..... yeah, NO! Screw that easy part!! I pushed past that previous 343kg record and to a new high of 373kg by my fourth set with 12 reps.

This week I changed from solid strength to some volume training (in light of the fact that last weeks 373kg didn't leave me with any soreness in my legs at all!). 173kg was all I managed on a 60 second set of powering up and a slow release down to a count of 4 followed by an instant power up again. Trust me, I'm feeling it this week!

Next week we aim for 400kg+. I'm suspecting I'll be able to get to 450kg as my fourth set with a minimum of 6-8 reps on that final weight before I fatigue. That will be an achievement and one to surely kick most guy's asses with!

THEN we try for my 1RM - the greatest weight I can press in a single push... any guesses where that weight will be?

Saturday, February 25, 2012

Arkadia English Breakfast Tea Latte

A couple of years ago I became aware of the brand Arkadia for their range of instant chai latte and hot chocolate powders. I've since noticed that several beverage outlets use their Chai Spice product for both chai tea and latte. The benefit to the Arkadia products is that you can simply use hot water or hot milk - and this goes for any of their tea/latte or chocolate mixes.

One of my favourite products is the Matcha Green Tea. It's quite a unique product for anyone who hasn't experienced the more traditional Matcha teas of Japan, and can be rather daunting to anyone unaccustomed to a bright green milk drink!

Through a promotional opportunity on the Arkadia email list I was sent a sample of their latest product in development, English Breakfast Tea Latte.

The instructions for the sachet were to add 170ml of pre-boiling water to the powder. This made for a sufficient quantity of tea.


The aromatics gave a definite English Breakfast tea aroma and the latte component made for a traditional milky froth on top of the drink. But I have to say the flavour was a little strong for a latte drink, and yet still a little milky to be a tea drink. As a tea drinker I wouldn't be inclined to purchase this variety because I prefer a very flat traditional tea taste. I can see where Arkadia are headed with their market and hope it brings about some new developments with their beverages but I think I'll be sticking to their Chai.


You can connect with Arkadia on their Facebook page or Twitter.

Please note, I have not been asked to promote the company or their products. In fact I asked on their Facebook page if I could mention the development of the English Breakfast Tea Latte on this blog but I didn't get a response.

(and I still don't know why Blogger isn't inserting my images as per their saved rotation!)

Monday, February 13, 2012

White Wings Lemon Meringue Pie

I confess that my biggest cravings are always for a piece of Lemon Meringue Pie. But, unfortunately it always seems to be a craving which remains unsatisfied no matter how simple or extravagant the attempted fix is.

So when I saw the White Wings Lemon Meringue Pie packaging on the supermarket shelf, I thought "why not?"

The required ingredients for the mix were far fewer than I had expected: One egg (separated), water. That's it. The mixture comes in three parts: the base, the lemon filling, the meringue topping.

The 2 and half tablespoons of water added to the base mixture seems very sparse, and the dough is quite tough to work with. In hindsight, I think I would prefer to make my own shortcrust base if I were to make the pie again. Nevertheless, there was enough base to adequately fill the Pyrex dish. The base was refrigerated.

The lemon mixture, with egg yolk and water, was quick to bind and gave a strong aroma of lemon essence. It would be a nice modification to add some lime juice and zest as recommended on the packaging. The filling was baked for only 30 minutes at 170 degrees (my oven is rather hot and quick.)

As the filled pie was removed from the oven to cool, the meringue mixture was combined with the egg white and water as required. The meringue came together very quickly and formed nice solid peaks. There was more than sufficient mix to completely cover the pie with a nice central dome.

Since the oven was still exceptionally hot, the meringue took on colour within around 7 minutes and baked through very evenly.

Taste result: a very nice lemon meringue pie for eating on the day of baking and the subsequent day. However, the base would not allow for keeping any longer than that - it began to taste plastic like and was quite tough.

p.s. I have no idea why Blogger isn't uploading my photos in saved rotation - I apologise for the requirement to tilt your head!


Saturday, February 11, 2012

Hot Cross Buns

So now the last of the Christmas stock has been cleared from the store shelves and we're bombarded with Easter stock (Oh. My. God. 2012 may as well be over already!), the first thing you tend to see as you walk in to any supermarket are buckets of Hot Cross Buns.

I have to say, I'm always partial to the odd bakery item especially when it's adorned with a chuck-out price sticker. And Woolworths didn't disappoint me with that yesterday - upon entry to their supermarket, a bakery employee was just re-stocking a front display with the paper-bagged Indulgent and Decadent 6-pack hot cross buns. They were enticing me with their orange reduced stickers for $2.99 instead of $4.98 (or 2 for $8)... so I picked up both!

The Indulgent White Chocolate and Cranberry range was very similar in texture and taste to a traditional hot cross bun, albeit the cranberries were a little more sparse than you'd normally expect with sultanas but were far far more plump and juicy. The white chocolate added a very subtle taste and texture throughout the bun.


The Decadent Dark Chocolate range was more decadent than I had imagined. The buns were slightly flat and looked as though they had been squashed, but I soon realised it was because the bun itself hadn't been able to maintain a high-rise shape due to the phenomenal amount of dark chocolate chips within each piece. It actually tasted like there was a solid layer of chocolate in the middle of the bun. Very delicious, very moreish and very addictive. Just be warned that by putting your hand in to the bag to extract one of these babies, you will end up with a chocolate coated hand as the stuff gets EVERYWHERE because there's just SO. MUCH. CHOCOLATE!!!


Whilst these were reduced stock, they were baked that day. And even though the Best Before date gave three days, I'd not only recommend they be eaten within 24 hours to take advantage of their freshness and soft texture (I wouldn't like to microwave warm them at any stage), I pretty much guarantee they won't last much longer than that in any household anyway!!

I will certainly be deviating from the traditional hot cross bun on my next purchase of bakery items from Woolworths in preference for these two ranges.

Tuesday, January 31, 2012

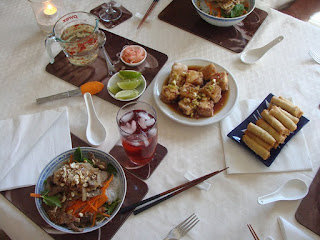
Vietnamese and Japanese inspired feast

The Central Markets in Adelaide have a lot to answer for!! The "old" food court as we refer to it, on the Western side of Moonta Street, has the best place for Vietnamese food I've come across. Over the years I became a great fan of dish #11, or, bun cha gao, and consequently I have developed my own version of the meal to suit my tastes and cooking styles.

Essentially I see the dish like a big cold roll opened out in to the bowl! We have shredded lettuce, cucumber, mint leaves and bean shoots under some rice vermicelli, julienned carrot, snow peas, a beef and onion in lemongrass mixture, and topped with fried shallots and crushed cashews.


As mum doesn't eat a lot of meat, I also make the dish with spring rolls to either top the noodles or to serve on the side.

A chilli vinegarette is poured over the dish and by the time you finally get to the bottom of it, the remaining vegetables and noodles are in a sweet and sour soup.

 
A meal at a Japanese restaurant on Brisbane's Southbank inspired the tofu dish I make to accompany the Vietnamese feast. Agedashi tofu is a fried (age) tofu in a fish (dashi) stock sauce. Because of mum's intolerance to fish I avoid the dashi component. But I have developed a gorgeous silky sauce to pour over the potato starch fried firm tofu pieces - equal parts mirin and ponzu (citrus soy), with chopped spring onions and chilli. 
 
By the time the hot starchy crust on the tofu has softened in the sauce, it leaves a sticky gooey texture on the bottom of the tofu piece and it absolutely melts in your mouth.

The meal is very fresh, very 'clean' eating (apart from the fried tofu - but it's hot, shallow oil so it doesn't absorb much). It's also the kind of meal which expands as you eat it... and there never seems to be an end in sight!

 The final feast: